Technique

You are currently browsing the archive for the Technique category.

If you want to use a PocketWizard FlexTT5/MiniTT1 on a non-Canon (make that non-Nikon if you have the recently released Nikon version) camera, you can do so by using Basic Trigger Mode which has been available starting with FW 4.100.

It’s quite simple to set up, if you know the magic sauce.

We will set Basic Trigger Mode in configuration C2. That way configuration C1 will remain available for use in ETTL mode. To keep things simple, we’ll use a MiniTT1 as transmitter and a FlexTT5 as receiver. You can actually use many FlexTT5 to drive multiple flash units. In this case, repeat the procedure for the FlexTT5 described below for every unit.

MiniTT1 (Transmitter)

    1.    Start the “Pocket Wizard Utility” on your computer. The screenshots below are from version 1.35. Other versions may differ a little. You can download the utility here for Mac and Windows.
    2.    Hook up the MiniTT1 to your computer using the supplied USB cable. The MiniTT1 should be turned OFF.
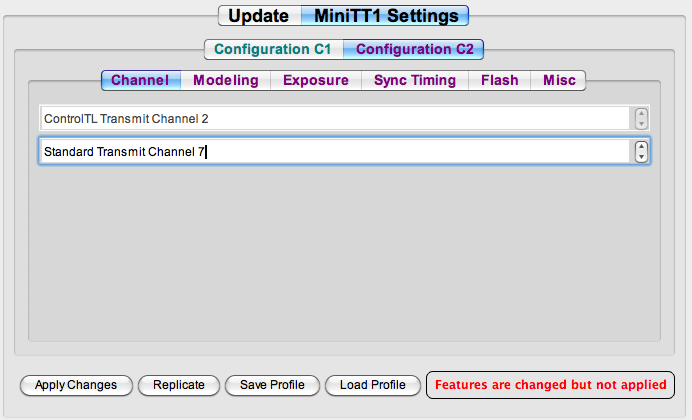
    3.    Go to Configuration C2 >> Channel and set the Standard Transmit Channel. The default is 2, you may want to change it to a different value if you expect to be shooting around other people with PocketWizards.

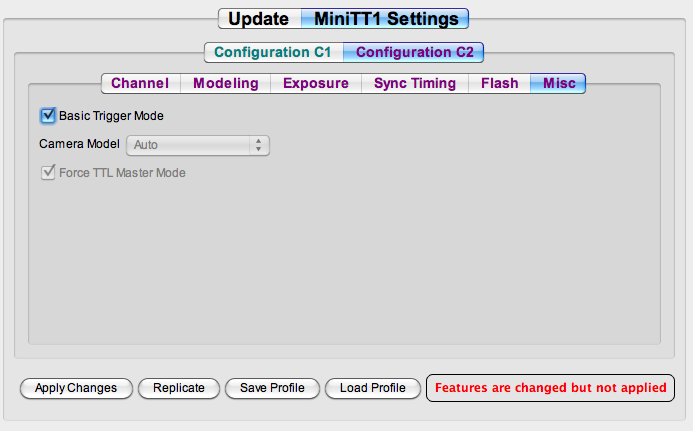
    4.    Go to Configuration C2 >> Misc and check the box Basic Trigger Mode.

    4.    Now press the button Apply Changes, confirm the question in the dialog box, and wait until the changes have been written to the device.

You are now done with the transmitter.

FlexTT5 (Receiver)

    5.    Now hook up the FlexTT5 receiver unit using the same USB cable. You can leave the PocketWizard Utility running, just remember to turn of the FlexTT5.
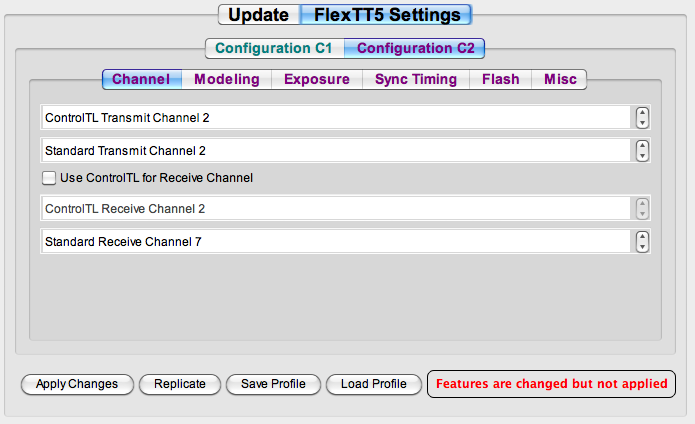
    6.    Go to Configuration C2 >> Channel and uncheck Use ControlTL for Receive Channel. Then set the Standard Receive Channel to the same channel you used as the Standard Transmit Channel in step 3. In this example, I used 7.

    7.    Press the button Apply Changes, confirm the question in the dialog box, and wait until the changes have been written to the device.

You are done with the receiver.

Repeat the receiver procedure with any other receivers you want to trigger simultaneously.

Let’s test it to see if it works:

Hook up a flash to the FlexTT5, turn on the flash, and set it to M (manual mode). Then turn on the FlexTT5 to setting C2.

Next, attach the MiniTT1 to the hot shoe of your camera and turn it on to setting C2. Then turn on the camera.

If you press the camera shutter release button, the flash should fire. Congratulations, it works!

I tried this using an Olympus E-P1 with a Canon 580 EX II and it works just like a cable – without the wires. 😉

In the last post, we looked at how a sharp image is created optically. In this post, we will look at how the physics render non-flat objects.

If all the points of the subject are in the same plane, they will all render with the same size circle of confusion in the image plane. This is the case if the subject is perfectly flat.

For non-flat subjects, the points of the subject are located at different distances from the image plane. So the projected points will have a minimal circle of confusion in different image planes. Since there is only one image plane, the projected points will all have different size circles of confusion – which means they will all be of different sharpness.

Each circle of confusion that is small enough will appear to be sharp. The distance from the nearest to the furthest point which are just rendered sharply is the depth of field.

The depth of field is determined by the distance of the subject from the camera, the focal length of the lens, and the aperture.

Some simple rules of thumb are:

1.  The further the subject from the lens, the greater the depth of field for a given focal length.

The greater the absolute distance between subject and lens, the smaller the relative difference in distances for different points of the subject. Because of this, the size of the circles of confusion are very similar in size.

If you look at the distance scale on a lens, you will notice that the distance between markings decreases the closer you get to infinity. And, speaking of infinity, there is a point from which on everything is in focus if you focus the lens to infinity.

2. The shorter the focal length, the greater the apparent depth of field at a given distance.

The hyperfocal distance, or the distance from the image plane past which every subject point is acceptably sharp if the lens is focused on infinity, decreases the shorter the focal length of the lens. This is because the magnification decreases, so the circle of confusion for a given subject point is also magnified less.

Remember though, that this is true only for a fixed distance!

3. The smaller the aperture, the greater the depth of field.

The smaller the aperture, the smaller the cone of light rays that passes to the image plane. Because the cone is smaller, the circle of confusion is also smaller.

In the illustration below, the aperture blocks the blue cone of light rays, only the red cone gets through. The circle of confusion on the image plane is smaller, so the image is sharper.

Illustration 3: A smaller aperture reduces the circle of confusion

Note that in practice, diffraction becomes a problem at small apertures. Diffraction will be discussed later in this series.

Bigger is not better

One important thing to keep in mind is that bigger is not necessarily better with depth of field. An image may actually be improved if (unimportant) parts are kept out of focus because the eye tends to focus (pun intended) on the part of the image which are sharp and tends to give the unsharp parts only cursory attention.

That said, if you are trying to render your image as clearly (sharp) as possible, you want to select your depth of field in such a way that the closest and furthest subject point which you want sharp are in focus.

For example, have a look at this image:

Forget-me-not
Image 1: The forget-me-not in the foreground is sharp, the background blurred.

The forget-me-not flower in the foreground is rendered in focus. The (rather cluttered) background is rendered out of focus.  The eye of the beholder will pass over the out of focus parts, thereby de-emphasizing the non-essential parts and concentrate on the subject in the foreground.

A common problem with photos is lack of sharpness. The image is either soft, or out of focus, or the wrong part of the image is in focus, or … the list of possible issues is a long one.

Just like exposure, focus is one of the parameters that the photographer must learn to control in order to create images that show what he or she visualized before pressing the shutter release.

This is the first of a series of posts that I will call “Image Clarity 101”. The name is a tip of the hat to John B. Williams who wrote the excellent “Image Clarity: High-Resolution Photography, which – alas – seems to be out of print.

I am going to look at what causes an image to be “sharp”. In later postings, I will explain what equipment and techniques to use to actually get an image to be “sharp”.

Focus

If we imagine that a subject is made up of an infinite number of minuscule points, each of these points emits an infinite number of light rays that hit the entire area of the camera lens. As the light rays pass through the lens, they are focussed on some point (the focal point) behind the lens, creating a cone of light.

Parallel to the lens plane is the focal plane, which holds an infinite number of focal points for all the visible points of the subject.

All of this is shown in the illustration below.


Illustration 1: Focus Explained (simplified)


The image plane is the surface the image is projected onto. This is where the film or image sensor is located. For an image to be in focus, the image plane must be the focal plane.
When you twist the focus ring on a lens, you are effectively moving the focal plane. When the image is sharp, the focal plane is located on the image plane.
Are you with me so far? Good!


Circle of Confusion

Now it gets a bit messier: since we are dealing with the real world, the light rays do not actually all converge on a single point, but form a small area, the circle of confusion.
In the illustration above, you can see that in the focal plane most of the light originating from a single point of the subject hits the small circle. As the image plane moves away from the focal plane, the light is spread over a larger area.

If this is too circle of confusion business to too confusing, have a look at the following, simplified illustration:

Illustration 2: Cone of Light

The subject is projected by the lens as a cone of light rays which strike the image plane. The tighter the cone is at the image plane, the close the image plane is to the focal plane.

If the circle of confusion is small enough, the human eye will register it as a single point. How small the circle needs to be is perhaps a topic for another post. For the time being, we can assume that if the circle of confusion is somewhat smaller than a single photo site on the sensor, it will not be a limiting factor for the overall sharpness of the image.
Illustration 3: As the circle of confusion increases, the image becomes less sharp.

So we reach a simple conclusion:

If a single point of the subject is rendered as a small enough circle of confusion, it will appear sharp in the image.

There is one important point to consider: all of what has been discussed above is only true for flat subjects and ideal lenses. In the next installment, we will look at sharpness for a non-flat subject.

If you don’t feel like getting an old book, you might try perusing the good old Wikipedia which contains much more on the subject.

I have added a (long) page to the site explaining how to use the Canon WFT-E1 (or WFT-E1A or WFT-E2, E3, E4, or E5) wireless transmitter to push images from your Canon DSLR to a computer running Mac OS X 10.5.

Freising is having it’s 80th annual fall fair this year and the town celebrated the last day today with some spectacular fireworks:

Blue fireworks in the night sky over a church tower.

Blue Fireworks over Church Tower.

In case you are wondering, it is actually quite easy to make this kind of photo if you know what you are doing:

  1. Set your camera on a tripod and use a cable release or a remote control (infra red remote, RadioPopper, PocketWizard, you name it) to trigger the exposure. I use a simple remote control cable.
  2. Turn off the auto-focus and manually focus the camera (usually to infinity). This is faster and more reliable than having the AF hunt the night sky.
  3. Crank up the ISO as far as you are willing to live with the noise. For example, on a Canon 5D, ISO 800 is great and ISO 1600 is acceptable. A Nikon D3X will go even higher, as will a Canon 5D mark II. A pocket digicam will probably struggle at ISO 400 and above. Experiment – preferably before the big event.
  4. Use manual exposure mode and open the aperture as wide as it will go.
  5. Still in manual exposure mode select a good exposure time. I find that between 1/125s and 1/8s works well.
  6. Expose at will and enjoy the show!
Green fireworks in the night sky over a church tower.

Green Fireworks over Church Tower.

I usually use the camera screen to judge exposure. That is, I set the aperture wide open and shoot at whatever exposure time I have guessed. Usually 1/60s is a good place to start as any.

It is normal to see some blown highlights in the middle of the explosions and at the back of the rocket engines. Because of this the histogram and the blinkenlights are useless. Instead, ensure that the night sky is black and that the fireworks are clearly visible.

If the sky is too light, shorten exposure time and/or reduce the ISO. Similarly, if the fireworks are too dark, lengthen exposure time and/or increase the ISO.

Once I have set up the exposure correctly I point the camera at a likely section of sky and snap away. Since the exposure will not change, I only change it to get a different effect. There is no need to check every image.

In fact, I simply snap away until either the fireworks stop or I grow tired of taking pictures. It’s a good idea to have some spare batteries and memory cards on hand …

That’s it. Have fun!

« Older entries