The Canon WFT-Ex/WFT-ExA range of products (currently E1..5) are wireless 802.11b/g transmitters that connect to Canon DSLRs and upload photos directly to an FTP server. There is also the option of connecting an Ethernet cable if you do not want or can not use a WLAN connection.
Each DSLR works with a different WFT product, so you will have to check which one is right for your camera. The WFT-E1 works with the 1D Mark II, 1D Mark II N, 1Ds Mark II, 5D, 20D, and 30D cameras, for example. The WFT-E1A is the North American version that only differs in the available WLAN channels from the rest of the world (WFT-E1).
You connect the WFT-E1 via either a Firewire (1D, 1Ds) or USB (5D) cable to the camera. Turn it on … and nothing happens. It’s actually a bit more work than that. 😉
The following instructions will walk you through how to set up both a Mac with an Airport connector and the WFT-E1 so that you can transmit photos directly to your Mac. This is a useful setup if you want to be highly mobile. It is also possible to go through a WLAN access point, which is often better than connecting directly to the Mac, but that will be the subject of a follow-up post.
There is quite a bit of setup required to get things to work, but I believe it is well worth the effort. Let’s get started!
1. Set up an FTP server
Start “System Preferences” in your Apple menu and go to the “Sharing” settings:

System Preferences - Sharing in Mac OS 10.5
Select “File Sharing”.
Then click on the button labeled “Options” to get this sheet:
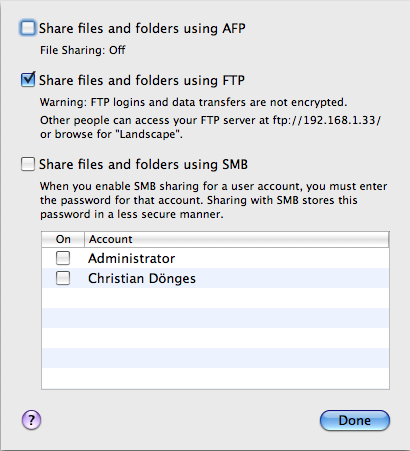
System Preferences - Sharing Options on Mac OS 10.5
Make sure you select “Share files and folders using FTP”. I disable all the other options (AFP is enabled by default). Click on “Done”.
Make sure that you have read-write access to your Public folder. This is the case by default.
You have now enabled the built-in FTP server that comes with Mac OS X. I suggest that you use an FTP client (I recommend the fine Interarchy or the free Cyberduck. Terminal.app also works just fine if you know FTP commands. 😉 ) to connect to ftp://localhost/ using your short user name and login password to make sure the server works correctly.
2. Set up the WFT-Ex for Ethernet
First thing is to install the Canon WFT-E Utility on your Mac. If you no longer have the CD, you can find version 3.3 here.
Then make sure you have a free port on your Ethernet hub or switch and a cable. Using Ethernet until things work is much easier than going the full monty immediately and trying to get WLAN to work as well. If you don’t want to use Ethernet, you have been warned …
Start the application that is appropriate for the WFT-Ex that you have. The following description is for the WFT-E1, but the others are similar with slightly more options.
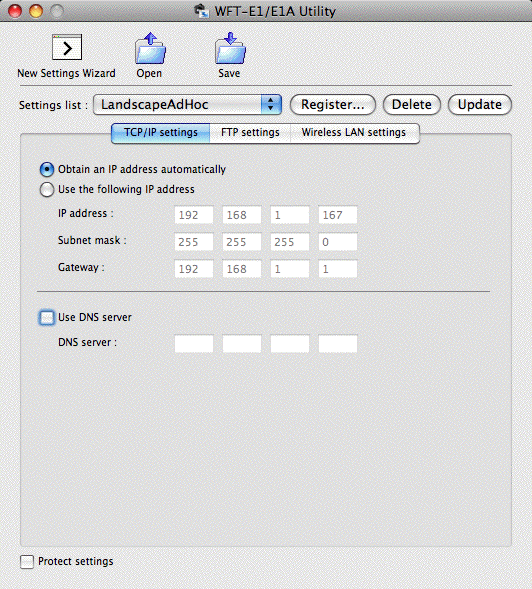
Canon WFT-E1 Utility 3.3 TCP/IP Settings
Select the “TCP/IP settings” tab. If your network has a DHCP server (usually your DSL router will have one built in) select “Obtain an IP address automatically”. If you do not, you have to manually set an IP address, subnet mask, and gateway. The last (gateway) is only required if you want to upload to an FTP server that is not on the local network.
A DNS server is only required if you do not want to use an IP address for the FTP server but rather a name.
Switch to “FTP settings”:
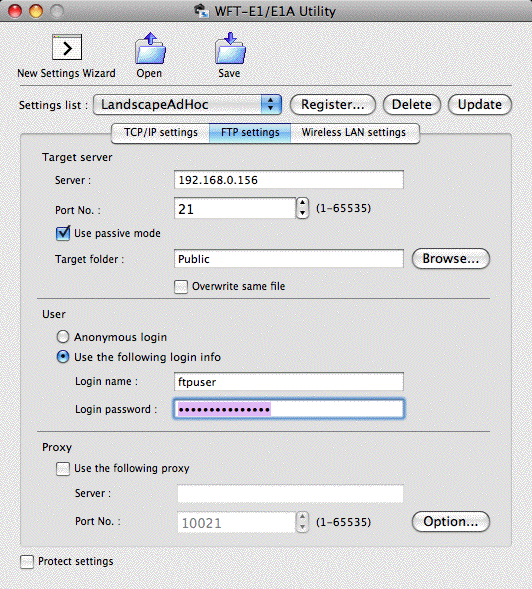
WFT-E1 Utility version 3.3 - FTP Settings
Enter the IP address (or name, if you configured a DNS server in the previous tab) of the FTP server. Unless you use a non-standard port, you want to leave the port at 21. Passive mode is easier to get through many firewalls, I always select it. Select a folder to store the photos in. I suggest the “Public” folder, but you can choose anything that you can access using your account.
I do not want anything to go AWOL, so I deselect the option to overwrite files. Since my camera is set to continuously generate new file names, this should not be a problem.
The user name and password are your (short) login name and password. Note that the short login name is probably not the same as the long user name used in the “Sharing” settings, above. I have not had any luck with an anonymous account on Mac OS and it is probably not a good idea anyways for security reasons.
If you are behind a firewall accessing a remote server, you may have to enter proxy settings. Chances are that if you have to do so, there will be someone who maintains the network and can tell you what settings you need.
3. Transfer Settings to the WFT-E1
Click on “Save” to create a file called nprofile.nif. This file must be stored on a memory card which is then inserted into your camera.
Make sure you have connected the Ethernet cable to the hub/switch and the WFT-Ex. Turn on the camera and the WFT-E1. Click on the “Menu” button on your camera. At the bottom, you should see a new menu entry Image transfer (LAN) settings. Select it, then select LAN Setting, then Set up.
In the next menu, set the LAN setting number you want to configure, then select Load settings and OK. The settings file on the memory card will now be loaded into the WFT-Ex.
Go back to Image transfer (LAN) settings and set the LAN type to Ethernet.
Exit the menu and press the shutter release of the camera. The camera now takes a picture and the WFT-E1 springs to life after a second or so.
You will probably see a blinking Ethernet symbol in the WFT-E1 display, as well as an error number (41?).
If you look into your FTP destination folder (i.e. “Public) you should see a new folder called “A”. It contains a folder “DCIM”, which contains a folder with the camera name:
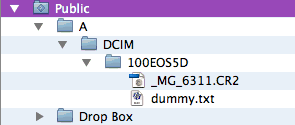
WFT-E1 Files and Directories with dummy.txt
The error you see will go away if you place any file into the folder with the camera name (see the empty dummy.txt above). Try it, it works.
If you are geeky, here’s why: the WFT-E1 tries to get a directory listing (NLST) in the camera name directory. If no files are returned, the connection is closed by the WFT-E1, otherwise transfer begins. I have no idea why this should be a good way to do things, so I would guess it is a firmware bug.
If you are happy using Ethernet, you are done. Otherwise, there is a final set of settings to make.
4. Set up WLAN
Start “System Preferences” in your Apple menu and go to the “Network” settings:
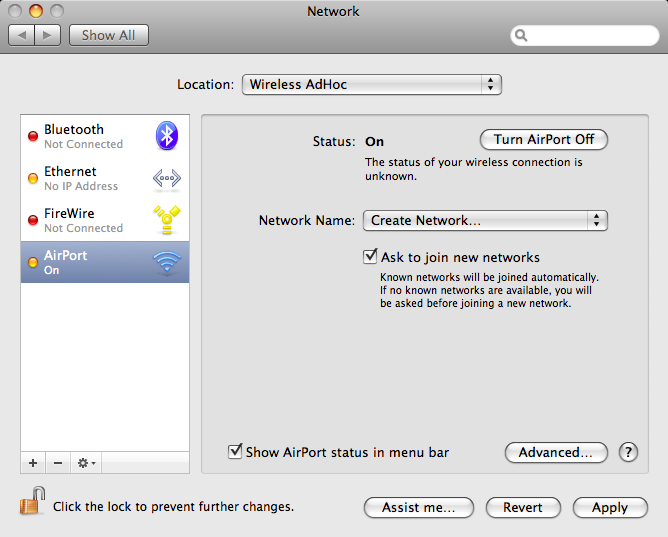
System Preferences - Network on Mac OS 10.5
Select “Airport” and enable it by pressing the button to the top right (“Turn Airport On”). Open the “Network Name:” popup and select the “Create Network …” entry. The following sheet opens up:
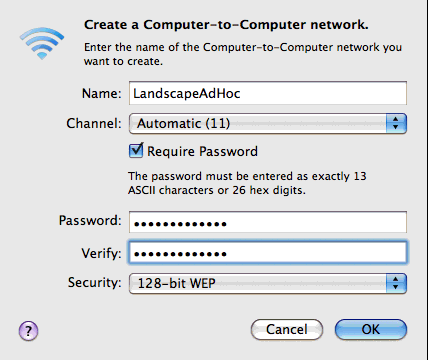
System Preferences - Network - Create Network ... in Mac OS 10.5
Fill out the network name, which you can make up. I strongly suggest that you also use a 128 bit WEP password. WEP security is very weak and easily broken, but FTP transfers passwords in the clear and you want all the protection you can get (what little there is :-(). Write down the name and password.
Go back to the Canon WFT-E1 Utility and select the “Wireless Lan settings” tab. The “SSID” is the network name which you made up. You are creating an “Ad hoc” network, so select that as well as the channel number which you set on the Mac.
If you set up a WEP key, select that (none otherwise as Mac OS X does not seem to support PSK for ad hoc networks) and enter the key exactly as you entered it in the System Preferences.
Load the settings into the WFT-E1 as described above. Set the LAN type to Wireless. Test. Smile!
Drop me a line or leave a comment here to make me smile. Then create some awesome photos you have wanted to make in a long time to celebrate. Share them. Life is good. 🙂
-
Hi,
I’ve got an WFT-E1a and Canon 5D (mark 1) and I’ve spent a whole day trying to setup a wireless networking and transfer photos from the camera to my computer, but it just didn’t work.
I was wondering if you could help me figure it out and make it work.
Trying to make things easier for you understanding whats my setup, Ive tried to list it all above.My Hardware
Canon 5D (firmware 1.1.1)
Canon WFT-E1a (firmware 2.0.1)
MacBook Pro 5.1
Airport
Modem: D-Link DSL-500B (routed)
Time Capsule 2TB (wireless)The setup.
Airport TCP/IP
Using DHCP
IPv4 Adress 10.1.1.4
Subnet 255.0.0.0
Router 10.1.1.1Ipv6 (auto)
————-
Sharing.File Sharing (Enable)
FTP Access: ON
Other people can access your FTP server at
ftp://10.1.1.4/ or browse for “My User’s MacBook Pro”.Shared Folders:
My User’s Public FolderUsers:
My User————
Canon WFT-E1a Utility (Version 3.3.0)
TCP/IP Settings
Obtain IP Automatically
DNS Server (Disabled)————
FTP Settings
Server 10.1.1.4
Port No. 21
Target Folder /Public (Test Write OK)
Overwrite same file (disabled)User
Login Info
My User.
My Password — (It is working ‘cos i could setup the public folder on target and it wasnt possible without the right user and password – Test Write OK.)Proxi
Disabled
————
Wireless LAN Settings
SSID Exactly the same as my network name, spelling, spaces, etc…
Connec Method. AD HOC (WFT-E1a)
Channel 1Authentication (disabled)
Encryption
NoneKey (left in blank)
——————
Thanks in advance and my contact is
Regards
Luiz
-
Error 62
-
Hi,
I really hope someone can help. I’m having a similar problem to Christian, but I keep getting an error 40 – cannot find FTP server. I am trying to connect my 40D via the WFT-E1A to my Macbook Pro.
I’ve set it up as per the above instructions… it seems to be ok connecting wirelessly – but no matter what I do won’t upload files to the FTP server (which I’ve tested locally, via Transmit.. can read, write, etc).
I’m at my wits end!
I know the transmitter (WFT-E1A with Canon 40D) worked fine with my PC and Netgear router.
If anyone can help, I’d be most grateful. I can post my detailed settings if need be, but just thought I’d post to see if anyone has come across this before and has a quick solution.
Cheers!
-
-
Comments are now closed.


7 comments
Trackback link: https://doenges.com/blog/howto-collection/using-canon-wft-e1-with-mac-os-x-10-5/trackback